


-
Latest Post
Showing posts with label SYSTEM ADMINISTRATOR. Show all posts
Showing posts with label SYSTEM ADMINISTRATOR. Show all posts
Run A Postal Software / Tool With The Specified Date/Time
RunAsDate is a small utility that allows you to run a program in the date and time that you specify. This utility doesn't change the current system date and time of your computer, but it only injects the date/time that you specify into the desired application.
You can run multiple applications simultaneously, each application works with different date and time, while the real date/time of your system continues to run normally.

How Does It Work ?
RunAsDate intercepts the kernel API calls that returns the current date and time (GetSystemTime, GetLocalTime, GetSystemTimeAsFileTime), and replaces the current date/time with the date/time that you specify.
Requirement Of System
RunAsDate works under Windows 2000, Windows XP, Windows Server 2003, Windows Server 2008, Windows Vista, Windows 7, and Windows 8. Older versions of Windows are not supported. There is also x64 version available in a separated download, for using with x64 applications.
Download From Google Drive
Solution for not loading of iMO site in windows XP
From 01.01.2015 onwards Post Offices from various locations are facing difficulty in accessing iMO site through internet explorer in the system working on windows XP operating system. In these places the site is loading in other browsers like Mozilla and chrome.
I think this is due to some modifications that have been done in the webserver side. This issue can be solved by upgrading the OS with Windows XP Service Pack 3. iMO site will work without any issue in the Windows 7 Ultimate SP1 systems.

In short , now the IMO site will not be loaded in the system working on Windows XP SP2 or earlier until necessary modification have been done in the sever side.
Windows XP SP3 can be downloaded from the following link.
Download
I think this is due to some modifications that have been done in the webserver side. This issue can be solved by upgrading the OS with Windows XP Service Pack 3. iMO site will work without any issue in the Windows 7 Ultimate SP1 systems.
In short , now the IMO site will not be loaded in the system working on Windows XP SP2 or earlier until necessary modification have been done in the sever side.
Windows XP SP3 can be downloaded from the following link.
Download
Steps To Resolve “isdone.dll” Errors
The Isdone.dll is a dynamic link library file, which means that it has a specific function which the computer uses in order to complete various tasks. Your computer needs Dynamic Link Library files in order to complete everyday tasks, and they belong in a virtual database called ‘The Registry’. This particular DLL file is used by your computer when playing games, the file then give your computer information on what to do when your computer is playing that game.
What Causes The Isdone.dll Error
Errors like these are usually due to the fact that the keys and subkeys inside your computers registry have either been damaged, corrupt or deleted. Either way it still causes a problem for your system if you are trying to do something with your computer when it needs that file.
How To Fix The Isdone.dll Error
Step 1 - Manually Replace The Isdone.dll File
- Download Isdone.dll from the Internet
- Save the Isdone.dll file onto your computer’s hard drive
- Browse to c:\Windows\System32
- Locate the current Isdone.dll on your system
- Rename the current Isdone.dll to IsdoneBACKUP.dll
- Copy & paste the new Isdone.dll into C:\Windows\System32
- Click Start > Run (Or search ”run” on Vista & Win7)
- Type “cmd” in the box that appears
- Type “regsvr32 Isdone.dll” on the black screen
- Press Enter
Step 2 - Re-Install Any Programs That May Be Causing The Error
Re-Installing any programs which will be causing issues will ensure that you can get the most out of your computer. You can use these steps to re-install Brink on your PC:
- Click Start
- Control Panel
- Add/Remove Programs
- Uninstall Programs
- When the list of programs load up find the necessary program and uninstall it
- Restart your computer
- Re-install the program
Step 3 – Clean Out The Registry
One of the big causes of Isdone.dll errors is through the “registry” database of your computer. This is a large database which stores vital information & settings for your PC, and is used continually to help Windows to read the files, settings & options that it needs to run. Although the registry is one of the most important parts of every Windows system, it’s continually causing a large number of problems thanks to the way it will often become corrupted and unreadable. This is the cause behind many Isdone.dll errors, and needs to be resolved by using a reliable “registry cleaner” application.
This step is best completed by downloading RegAce System Suite, and letting it clean out any of the problems that your system may have inside.
How To Fix Windows Error 2

Windows Error 2 is an error that occurs when you are attempting to install a language pack on your system. There are two circumstances when you can receive this error: the error could appear after you cancel a language pack update or if the update goes wrong. Here is a tutorial that will help you fix Windows 2 error quickly and easily.
What Causes Windows Error 2
An error like this would normally be caused by the following conditions:
- Registry keys have been damaged or corrupt
- Windows settings have been damaged
- Windows Update is not working properly
How To Fix The Windows Error 2
If you received the error after canceling an update, then it is recommended that you try to install the language pack again and do not cancel the installation.
But if you received the error and did not cancel the update, then it is recommended that you restart your computer and try to install the language pack again.
Step 1 - Install The Language Pack Again
- Open Windows Update by clicking the Start button, clicking All Programs, and then clicking Windows Update.
- In the left pane, click Check for updates, and then wait while Windows looks for the latest updates for your computer.
- Click View available updates.
- Select the language pack that you want to install, and then click Install. If you are prompted for an administrator password or confirmation, type the password or provide confirmation.
After installing a language pack, we recommend that you install any additional updates that Windows found for your computer.
Step 2 - Clean Out The Registry
One of the main causes of Windows 2 error is a corrupted registry database. The registry stores vital information and settings your computer can’t run without, and is used continually. When Windows opens files, settings and options, it accesses the registry all the time. Although the registry is one of the most important parts of every Windows system, it’s known to continually cause a large number of problems because of the way it’s built. Registry corruption and obsolete keys can cause Windows 2 errors. Luckily, in most cases you can fix them by using a reliable registry cleaner.
This step is best completed by downloading RegAce System Suite, and letting it clean out any of the problems that your system may have inside.
This step is best completed by downloading RegAce System Suite, and letting it clean out any of the problems that your system may have inside.
How To Fix iTunes Error 1601 or 1602 When Restoring An iPhone / iPod
When you attempt to restore an iPhone or iPod using itunes, you may experience error 1601 or error 1602. This can occur when the installation of itunes and the Apple Mobile Device support are corrupt. Itunes incorporates the Apple Mobile Device support when you install it. Itunes is essential for the operation of an iPod/iPhone, it allows the transfer of data to and from a PC or Mac, and also charges it.
What Causes The 1601/1602 Errors in iTunes?
When attempting to restore your iPod/iPhone, you may receive one or both of the following error messages:
The iPhone could not be restored. An unknown error occurred. (Followed by 1601 or 1602)
The iPod “[username]” could not be restored. An unknown error occurred (1602)
The device is not then restored. This error is common when the installation of iTunes is corrupt, the protocol it attempts to follow is not fully operational and so cannot complete the task. The simple solution to this would be to completely remove iTunes and install the latest version. It may also be a problem in the registry. You can use a “Registry Cleaner” to eradicate any broken or damaged entries in the registry.
How to Fix iTunes Errors 1601/1602
Step 1 - Reinstall iTunes and Apple Mobile Devices Support
Completely removing these programs and reinstalling them will remove any corrupt instances of this application that may be hindering the use of the software. To remove it completely (on a Windows PC):
- Click Start > Control Panel > Add/Remove Programs
- Locate “Apple iTunes” and “Apple mobile devices support”
- Remove both these entries
- Locate the directory where these were installed (ie. C:\Program Files\Apple\iTunes) and remove all traces of them from there
- Use a registry cleaner to remove any lingering registry values
- Download the latest version of iTunes and install it
You can find the latest version of iTunes from: http://www.apple.com/itunes/
This will remove any corrupt files and will provide the latest version of iTunes, which adds extra compatibility with various other devices. This means that it is not likely to reproduce this error.
Step 2 - Clean Out The Registry
The ‘registry’ is a very important part of the Windows operating system, and is frequently used to help your computer run as smoothly and effectively as possible. Unfortunately, the registry is also the cause of a lot of errors inside Windows, as it ‘s constantly being opened and read 100’s of times a day by all your software tools. This is a big problem, as it means that your computer gets confused about the files it requires to run, leading it to run slower and save many of its registry files in the wrong way. Not only does this make your PC extremely ineffective, but it also causes a lot of the errors that continually appear, such as the 1601 / 1602 error. To ensure your PC does not cause these errors again, it’s recommended you use a ‘registry cleaner’ like the tool below:
Run Time Error 76 Path Not Found/ 70 Permission Denied in Windows 7
In Some times while open a Point of Sale Module in Windows 7 / Higher version of Operating System it shows an error message, Run -time Error "Error in opening the Database - 70 Permission denied" so that we could not open Point of Sale.

In Windows 7 / Windows Server 2008 while opening Speed Net Module it shows an error message as Run-Time Error 76 Path Not found.

in Postman Module it shows an same error message as Runtime Error 70 Permission Denied.
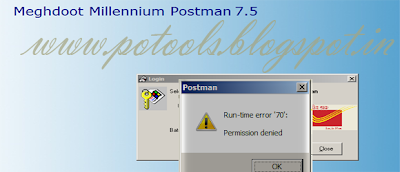
Both the above messages are Common issues of Windows 7 Security issues.
Solution
User Access Control - Should be Lowest Level
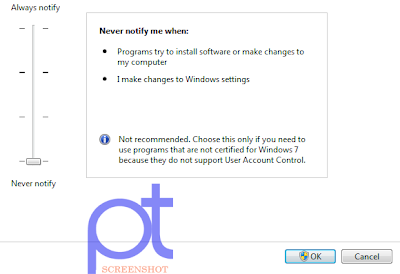
- Click Start > Type UAC.
- Click On Change User Account Control Settings.
- Select Never notify in UAC Settings then Press OK.
Note : If Already Configured as Never Notify, Just Move the Once up and Down as Never Notify then press on OK. Reboot your machine to take effect.
How To Fix Runtime 53 Error

Runtime Error 53
What Causes Runtime Error 53?
Runtime Error 53 usually appears as such:Runtime error ’53′: File not found (yourfile.dll).This can occur when the DLL that the application is attempting to look for cannot be found, or is not in the same place as the MTS component. “yourfile.dll” is the file name of the DLL file in question and you should take note of this. To resolve this problem, you must move the DLL file into the system32 folder on the C:\ drive. This error is best dealt with quickly to stop any further problems developing. Follow the following steps to find a solution.
How To Fix Runtime Error 53
Step 1 - Move The DLL File To The “C:\Windows\System32″ Folder
Make a note of the DLL file that was causing the runtime error 53 and then:- Perform a search of all your hard disks to find the current location of the DLL file
- Once the search has found the relevant file, copy it from it’s location (Right click > Copy)
- In Windows Explorer, go to C:\Windows\System32.
- Once inside this folder, paste the DLL file in there.
Step 2 - Re-Install The Application Causing The Error
If you find that Step 1 does not work, or is not applicable, then you should look to reinstall any application causing the error you’re seeing. This is quite easily done if the program is a third-party piece of software from Windows. Here’s how to re-install the software that could be damaged:- Click “Start” > Control Panel > Add / Remove Programs
- Locate the program causing the error
- Click “Remove” / “Uninstall” to get rid of the program
- Restart Your System
- Install the program again
- Test to see if the error shows
Step 3 - Manually Add / Replace The File On Your PC
If you know which file is damaged / missing, you should look to replace it on your PC. This can be done by following the steps below:
1) Download the file from the Internet
2) Unzip the new file onto your computer’s hard drive
3) Browse to c:\Windows\System32
4) Locate the current file on your system
5) Rename the current file to <<filename>>BACKUP.dll
6) Copy & paste the new file into C:\Windows\System32
7) Click Start > Run (Or search”run” on Vista & Win7)
8 ) Type “cmd” in the box that appears
9) Type “regsvr32 <<filename>>” on the black screen
10) Press enter
This will replace the missing file on your PC with a fresh, new copy that your PC should be able to access again. However, if this does not solve the error, you may wish to try using Step 4 below:Step 4 - Clean Out The Registry
Registry cleaners can play a very important role in how well Windows operates, and can help stop the Runtime 53 error. The registry is basically a central database which stores vital settings and information for your system, allowing Windows to remember a huge number of details for your PC. Unfortunately, the registry is also prone to becoming corrupt, leaving your system running extremely slowly and unreliably. To fix this problem, you should use a ‘registry cleaner’ to scan through your registry and repair any of the damaged parts of it that are causing your computer to run extremely slowly or with errors. You can download our recommended registry cleaner below:INSTALL SQL SERVER 2008 R2 IN WINDOWS 2008 SERVER / SEVEN
SQL 2008 Server R2 Installation
An evaluation copy of SQL Server 2008 R2 can be downloaded from here.
Recommendations Before Installing SQL Server 2008 R2
- Use NTFS file system.
- Do no try to install SQL Server 2008 R2 on a compressed drive, because setup will block the installation.
- Do not install SQL Server on a Domain Controller.
- Configure your firewall to allow SQL Server access.
- The user account that is running SQL Server Setup must have administrative privileges on the computer.
- Verify Windows Management Instrumentation service (Control Panel -> Administrative Tools -> Services) is running.
- The computer where you are planning to install should be connected to the Internet.
- Do not install SQL Server 2008 R2 side-by-side with SQL Server 7, because it is not supported.
Software Requirements
- .Net Framework 3.5 SP1 is needed.
- Windows Installer 4.5 or later is required.
- Internet Explorer 6 SP1 is required.
Hardware Requirements
- At least 2.0 GB of available hard disk space
- Supported Operating Systems: Windows Server 2008 ; Windows Server 2003 Service Pack 2; Windows Server 2003 Small Business Server R2; Windows Vista; Windows XP Service Pack 2
- 1024 x 768 video resolution
Installation Instruction
Run SQL Server 2008 R2 setup. First, setup checks to determine software requirements are installed. If not, you will be prompted to install

- Install .Net 3.5 and Windows Installer 4.5
In SQL 2008 R2 Installation > New Installation / Add features to an existing Installation.

The following is a new page on SQL Server setup, its name is Setup Role. Here you have three options:


 This page is just for the purpose of reviewing disk usage. Click on the "Next" button to continue setup.

It is recommended to create a local user or domain user account to start SQLServer services, the next page setup will display is all about SQL Server service accounts.
If the computer is not part of a domain, use a local user account without Windows administrator permissions. You can create this account using Control Panel -> User Accounts.
Use a Domain User Account if the service must interact with network services or access domain resources. This account should be pre-created by a domain administration in your environment.
- Choose "SQL Server feature installation" to install SQL Server Database Engine, Analysis Services, Integration Services, Reporting Services.
- Choose "Analysis Services with SharePoint Integration" if you want SQL Server setup to add PowerPivot for SharePoint to a SharePoint farm.
- Choose "All Features With Defaults" to install all features of SQL Server in one box.
The page below belongs to the second set of Setup Support Rules.
It is recommended to create a local user or domain user account to start SQLServer services, the next page setup will display is all about SQL Server service accounts.
If the computer is not part of a domain, use a local user account without Windows administrator permissions. You can create this account using Control Panel -> User Accounts.
Use a Domain User Account if the service must interact with network services or access domain resources. This account should be pre-created by a domain administration in your environment.

On the Database Engine Configuration page, choose the authentication mode to use for your SQL Server installation.
Enter and confirm the password for the (sa) login when you choose Mixed Mode Authentication.
